Georeferencing Tools Compared
An examination of georeferencing in ArcGIS Pro, QGIS and ERDAS
Geo-referencing in ArcGIS Pro, QGIS and ERDAS
This document examines georeferencing functionality in ArcGIS Pro, QGIS and ERDAS. This is a mini "howto" guide of the basic steps along with a discussion on the approach taken the user interface (UI). It will also serve as a reminder for my future-self on where to find things (here's looking at you ArcGIS!).
ArcGIS Pro
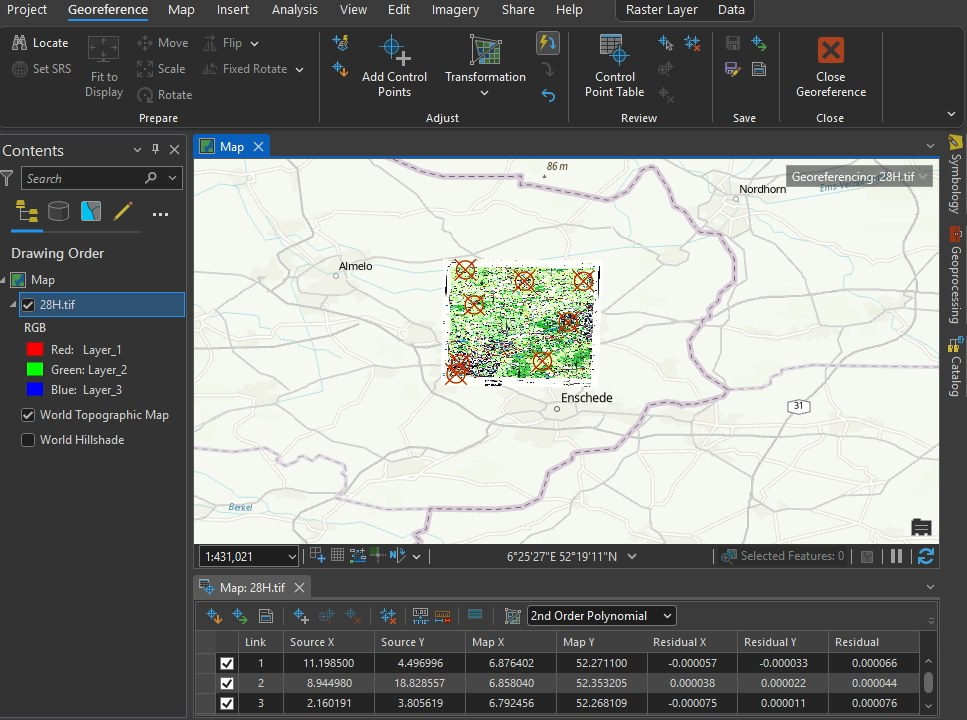
- Bring the image to be georeferenced into the contents pane.
- From the top menu we can select georeference (via the "Imagery" tab).
- In the base map windown move to the approximate area covered by the image you wish to georeference.
- In the georeferencing ribbon, click "fit to display". This will place the image in the centre of the map window. It might take a little bit of extra zooming and scrolling to get it nicely positioned near your chosen area.
- NOTE!!! holding C while moving the mouse allows for navigation when adding control points. The mouse wheel can be used for zooming.
- In the raster tab it's possible to set the transparency for the image or it's also possible in between setting the "TO" and "FROM" control points to actually unselect the image visibility in the contents pane. This depends on the image and whether the transparency fits ok for your needs.
- Enter the control points as required. 6-10 for 2nd and 3rd order polynomial. The actual tranform used can be selected from the tranformation dropdown (in the georeferencing ribbon).
- The control point table can be opened and this will show the residuals (errors).
- Save in the ribbon to finish and exit.
In general, the process is relatively straightforward although ArcGIS Pro's magical mystery dynamic ribbon is alway fun and a test of memory (hence this post!). The UI is a little fiddly as it expects you to immediately place the "to" control point - which is rarely the case as one needs to remove the visibility of the image or navigate around. It works ok once you've grasped this approach but it's not entirely intuitive. The approach taken by the other two tools makes for a better UI.
QGIS
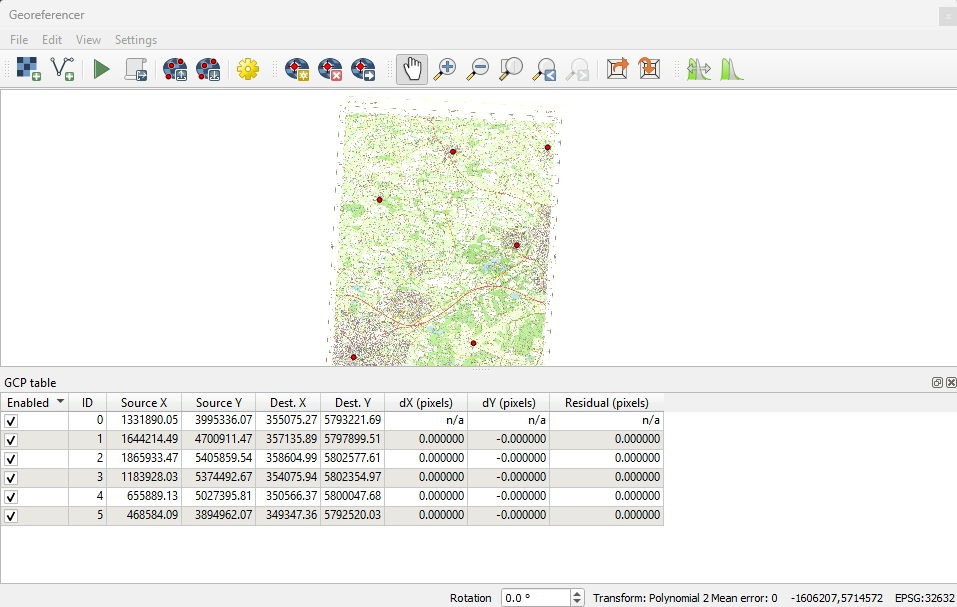
- The georeferencing tool is available via the top menu in the layer dropdown. This opens a dialog which can be docked or can float (very handy when using a second screen).
- The image to be georeferenced can be dragged into the top pane of this dialog or can be opened by the menu system. The bottom pane shows the control point details.
- Adding a control point prompts a further dialog where coordinates can be entered or you have the choice to select from the basemap in QGIS. This is really nice, intuitive and quick - especially when using two screens.
- The transform and other configurations can be set via the settings menu. This includes the transform, any resampling and the location/filname for the transformed image.
- There is a "play" button to perform the transform and on completion this opens the georeferenced image as a layer in QGIS.
Overall, this was a really straightforward process. The UI is really nice and completely intuitive - an absolute joy to use.
ERDAS
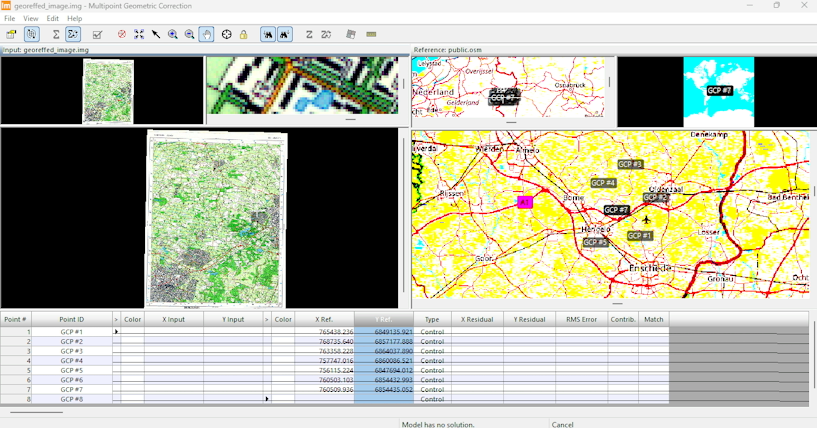
- Bring in the image to be georeferenced into the viewer. There should then be a multispectal tab in the dynamic ribbon. To the right are tools for transform and orthorectification.
- Selecting "control points" takes you through steps to open the groreferencer. Here we need to select polynominal (to do manually from a scan in this instance).
- We can choose where the control points will come from (OSM, Bing or another image).
- The georeferencing tool is similar to QGIS with a pane for the points at the bottom and the image(s) at the top. In this case the top pane is divided into two, the left for the image and the right for the basemap.
- The control points workflow appears to be to add all the points to the image and then do this for the basemap (rather than prompting "to" and "from") This is not as intuitive as QGIS but works ok.
- Once the points are in place the georeferencing model can be saved with the control points. I had to exit the georeferencer and then come back in and select the model in order to apply the transform (this is available in a separate dialog). This part is very fiddly and confusing. There are also lots of dialogs popping up and these can be hidden when using multiple monitors so it does get quite confusing.
There may be specfiic use cases for georeferencing in ERDAS where the "models" approach works. I suspect this is when bulk referencing satellite or aerial products in a more advanced workflow. To to georeference a simple single image (e.g. of an scanned old paper map in this example) the UI is good right up until the point of wanting to apply the transform and save. The "model" approach here then confuses things.
Conclusion
This was an interesting exercise to compare the tools as each takes and different approach to the UI. For me, the clear winner was QGIS as it was quick,
simple and intuitive. ArcGIS Pro was a little fiddly due to the need to turn the image visibility off in between placing the control points and the difficulting of navigating around the basemap.
ERDAS was fine right up until the point of applying the transform and saving a new image. There are a few quirks and it is dialog heavy. I do suspect that ERDAS is designed with a different
process in mind rather than transforming a simple single image though.
I found this super interesting and hope to do further image work in the future. This is my first time transforming images after some considerable time since university, and therefore, it will be interesting to refer
back to this document in the near future to see if my thoughts on this change.