WebODM
This section gives some details on WebODM, an open source tool for photogrametry and 3d modelling. Equivalent paid-for peers would include products such as
Pix4d and Dronedeploy. This document gives some examples, but primarily serves as a reminder to my future self on the steps to configure and use it.
I have a DJI mini pro 3 for photo and video capture and Dronelink is used to plan mapping missions (more on this below).
Setup and Configuration
WebODM provides a dockerised setup which can be pulled from github and launched with docker compose. The stack seems
to consist of a Django back-end (Go Djangonaughts!) with a React front-end. Redis and Celery are used for task handling. A 3d viewer is
(Potree) is packaged with WebODM which can be also be setup to run independently(see below).
The setup on Windows is a little complicated as this requires (at least for build) installation of GDAL and some other spatial libs that involve
quite a bit of faff with Conda. I therefore chose to install in WSL2 Ubuntu whih was super easy and worked straight out of
the box without any fuss.
Mapping and Processing
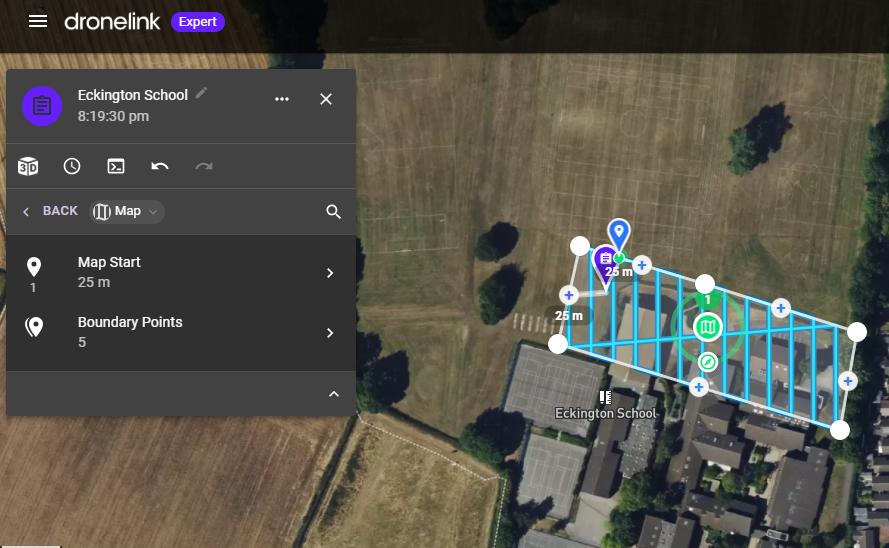
Dronelink was used to plan the mapping mission. Dronelink for hobby use (elite) costs about 120usd as a one-off
payment. It is web-based and comes with an app that can be downloaded onto the phone used with the drone.
Setting up missions is simple and there are a wealth of youtube video tutorials on the same. Typically one would
want overlapping images of 70% (this can be specified) and a gimbal angle to enable 3d to capture appropriately. The
drone is configured to take photos periodically (every 2-3 seconds) and will fly the mission capturing photos as required. It is
super easy, although does require a little trial and error to get the settings right. For example, the school 3d image further below,
the mission was too simple and hence much detail is missed. Setting up as a full grid pattern (a config option) and adding additional plans (such as a circular orbit
around key buildings) would have increased fidelity.
It should be noted that image capture mission can be flown manually - automated missions are not mandatory - although the manual approach risks missing areas due to errors in image overlap. Conversely, fear of
this also tends to result in more images being taken when trying to compensate for possible issues.
Processing of the resulting images is very straightforward. Simply transfer them from the drone to the local computer, create a project
in WebODM and then upload the images into the project. There are a number of presets configurationw that tweak certain parameters for specific
needs including among others: 3d modelling, orthophoto or DEM.
The processing may take significant time where there are many photos or if the local computer has limited processing power. In
my case I am using a five year old laptop with no video card, and therefore, I chose to use WebODM lightning
which is an integrated online image processing account. Simply setup an account link in WebODM and the processing will happen
using cloud-based GPUs. This is really smooth and simple and a nice way to get started.
Once processing is done it is possible to download a package of the output assets (pointcloud, orthophoto etc.) or these can be
viewed within WebODM itself via the integrated Potree viewer. It is possible to specify a textrure map of images to be overlaid on the mesh or you can
just stick with the pointcloud. It's quite heavy on processing so depending on the power you have available it's handy to reduce
the number points being displayed (defaults at 10m. 2m is responsive on my ailing laptop).
Processing for Presentation online
WebDOM can be self-hosted quite easily and it has the option to change the branding, I believe with the intention
that clients could be directed to such a site to view a mapping project. Given that the backend is in Django it would comes with all the nice in-built admin auth stuff.
Given that I'm a tight-arse, I did not want to set up a separate server for WebDOM and the current is already a little packed with
Django and Geoserver. Therefore, I looked to display the examples on this page directly using the potree viewer. This means
that I can only present the pointclouds rather than the textured model (WebODM only) but I think this is a fair compromise.
Unfortunately the assets provided from WebODM cannot be direcly used by potree, I therefore had to use the "PotreeConverter"
tool to convert from point cloud to the format required by potree. NOTE: I had to use PotreeConverter 1.7 (v2 failed).
The steps followed are:
- output the 3d model as a point cloud from WebODM. This gives you a single .laz file
- use PotreeConverter (1.7) to create a package that can be read by potree
- link the model using one of the page templates in the github repo. I used "viewer.html"
        -> from terminal where PotreeConverer.exe is located.
        -> Format  inputFile -o outputFile
        -> -h for help

        ./PotreeConverter.exe ./../converter_data/webodm_orig/eck1.laz -o ./../converter_data/eckington2
NOTE: The "--generate-page" tag can be used in PotreeConverter to output an html page with all necessary libraries packaged ready for use in a webserver.
        -> Pointclouds are quite large so these are copied up to the server separately rther than have them in Github.
        -> To copy data into docker container, docker proves the "docker cp" command

        docker cp pointclouds app_container:vol/static/potree
Example Pointcloud Captures
- School - simple quick first attempt at part of a school
- House - manual capture of house. gaps where missed areas
- School Field
Links
Dronelink
WebODM
WebODM Lightning
Potree (Github(
Potree
Potree Converter